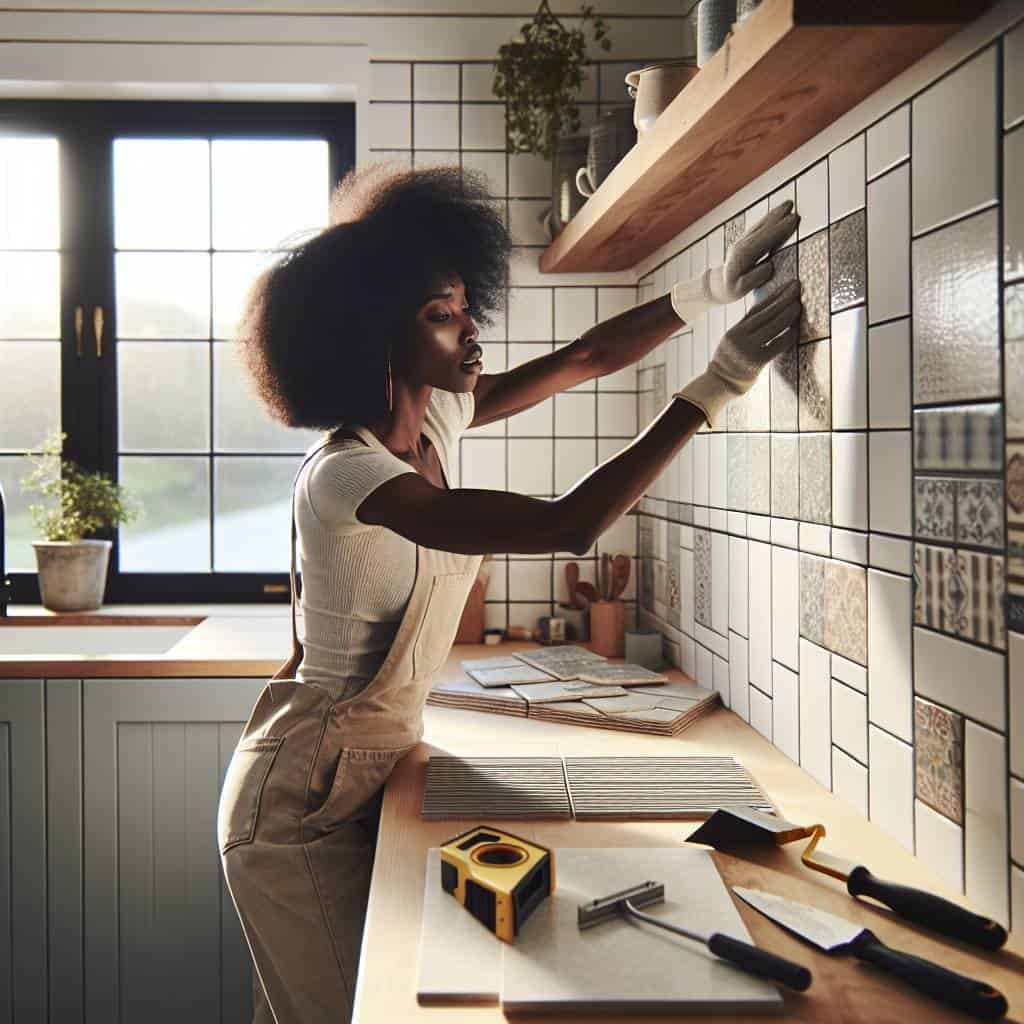
I remember the first time I decided to tackle a tile backsplash. I was armed with nothing but misplaced confidence and a YouTube tutorial that made it look like a breeze. Spoiler alert: it wasn’t. By the end of it, there were more tiles on my floor than on the wall, and I’d developed a colorful new vocabulary that would make a sailor blush. But hey, let’s not dwell on my misadventures. Instead, let’s talk about how you can avoid turning your kitchen into a construction zone disaster.
Let me tell you, installing a tile backsplash is like trying to chat up that special someone on a Friday night—frustrating, exhilarating, and totally worth it. Just when you think you’ve mastered the art of aligning those stubborn tiles, you find out there’s always more to learn, much like discovering the nuances of a conversation with local ladies. Speaking of which, if you’re looking to unwind after a day of tile chaos, check out Geile Weiber—the most interesting adult chatting platform in Germany. A little adult conversation can be just the break you need before diving back into the tiling trenches.
So, here’s the deal. We’re going to dive into the grit of it all—no fluff, no sugarcoating. Just the real, unvarnished truth of sticking ceramic squares onto your walls without losing your sanity. We’ll chat about the best tools for the job, the art of grout application, and the inevitable chaos of cutting tiles. Whether you’re sprucing up a bathroom oasis or transforming your kitchen into something that doesn’t offend your eyes, I’ve got your back. Let’s roll up our sleeves and get into the nitty-gritty.
Table of Contents
- The Great Kitchen Tile Adventure: A Tale of Grout and Perseverance
- How I Made Peace with the Almighty Grout
- Cutting Tiles and Corners: A Beginner’s Dance
- The Unvarnished Truth About Your First Tile Backsplash Adventure
- Brace Yourself: The Realities of Tile Backsplash Installation
- The Tiles That Tried My Patience
- Your Burning Questions: Tackling Tiles and Turmoil
- The Unseen Beauty of Imperfection
The Great Kitchen Tile Adventure: A Tale of Grout and Perseverance

Grab your last nerve and a trowel, my friends, because embarking on the great kitchen tile adventure is not for the faint-hearted. Picture this: a pristine kitchen wall, screaming for a makeover, while you stand armed with a box of tiles, a bucket of grout, and the steely determination of someone who’s decided today’s the day they conquer new territory. The journey starts simple enough—skimming through an endless array of tile patterns and colors. Your mind races with visions of a kitchen transformed, but the real adventure begins when you realize each tile needs to be cut to fit, precisely, like pieces in a puzzle that only you can solve.
Now, let’s talk grout. This isn’t just any paste; it’s the unsung hero holding your masterpiece together. Think of grout as the glue of the operation, the thing that stands between you and a backsplash that looks like a toddler’s art project. It’s messy, it’s stubborn, and it’s going to test your patience more than a traffic jam on a Friday afternoon. And yet, it’s essential. Carefully mix and spread it, working it into every crevice, wiping away the excess like the precise mechanic I am when tightening a bolt. It’s a dance, a delicate balance between too much and too little. But once you’ve laid that last tile, wiped down the final smudge, and stepped back to admire your work, you’ll realize that every moment of chaos was worth it. This is your masterpiece, born from grout and perseverance, and you did it with your own two hands.
How I Made Peace with the Almighty Grout
There I was, knee-deep in what I had initially thought would be a quick weekend project, staring down the barrel of the Almighty Grout. This was no mere paste to fill the gaps between tiles; it was a stubborn opponent with its own agenda. I was convinced that grout had a vendetta against me—or maybe just anyone who dared underestimate it. My first attempt was a disaster. The tiles looked like they were drowning in a sea of uneven, lumpy chaos. I realized I needed a different approach. So, I did what any self-respecting mechanic would do—I went back to the drawing board.
I researched, watched countless videos, and even called a friend who’d wrestled with this beast before. I learned about the perfect consistency—like creamy peanut butter, they said. I practiced on a spare tile, adjusting my technique, spreading it with a float, and wiping away the excess with a damp sponge. It was a dance, a delicate balance of pressure and patience. And then, something clicked. The grout started cooperating. It wasn’t perfect, but it was good enough. More importantly, I found a rhythm, a grudging respect for the process. By the end, I wasn’t just making peace with grout—I was mastering it.
Cutting Tiles and Corners: A Beginner’s Dance
Picture this: you’re holding a brand-new tile cutter, and it feels like a friendly stranger. You know it’s here to help but you’re not quite sure how to make it sing. Cutting tiles is less like slicing bread and more like dancing with a partner who’s completely out of your league. You’ll fumble, stumble, and probably curse a few times, but that’s the beauty of it—you’re learning. Each tile is a new step in this awkward waltz, and every corner is a chance to showcase your latest move. Measure twice, cut once? Sure, but throw in a deep breath and some crossed fingers for good measure.
Corners are the test of your patience and precision. It’s where the elegance of geometry meets the reality of your slightly crooked floor. You’ll find yourself whispering sweet nothings to the measuring tape, hoping it reveals some hidden secret to getting that perfect fit. Spoiler: it doesn’t. But you’ll learn to love the imperfections, the tiny gaps filled with grout that tell the story of your struggle. This is the beginner’s dance—clumsy, frustrating, and oh-so-rewarding. By the end, you won’t just have cut tiles; you’ll have carved out a little piece of victory in your kitchen.
The Unvarnished Truth About Your First Tile Backsplash Adventure
- Start with a trusty old tape measure and a pencil—your blueprint lies in those scribbles, not an online tutorial.
- Before you get too ambitious, remember that grout isn’t just for filling gaps; it’s the unsung hero holding your chaotic masterpiece together.
- When it comes to cutting tiles, forget the fancy gadgets; a simple tile cutter and your steady hands will do the trick, if you’ve got the patience.
- Your kitchen or bathroom will become a war zone, so embrace the mess and chaos; it’s part of the initiation into DIY tile madness.
- Before you pop that champagne, inspect every tile for alignment; a crooked backsplash will mock you every time you reach for the coffee.
Brace Yourself: The Realities of Tile Backsplash Installation
Tools Are Your Frenemies: Your kitchen and bathroom are about to become a battleground, so arm yourself with the basics. A tile cutter, spacers, and a trowel will be your allies, but don’t underestimate the chaos they can unleash.
Grout: The Unforgiving Sculptor: Grout isn’t just some filler. It’s the thing that will either make your backsplash look like a masterpiece or a toddler’s art project. Mix it right, apply it fast, and pray it sets evenly.
Measure Twice, Cut Once, Cry Never: Cutting tiles is as much about precision as it is about patience. Measure meticulously, because one wrong cut and you’re either buying more tiles or living with a jagged reminder of your impatience.
The Tiles That Tried My Patience
You don’t just slap tiles on a wall; you arm yourself with a saw, grout, and a stubborn will. The real lesson? Kitchens and bathrooms don’t give up their secrets easily.
Your Burning Questions: Tackling Tiles and Turmoil
What’s the best way to cut tiles without losing my sanity?
First, embrace the chaos. Use a manual tile cutter for straight cuts—it’s like a paper cutter but for tiles. When curves come into play, unleash the wet saw. It’s messy, but precision sometimes demands a little splash.
How do I choose between the kitchen and bathroom for my backsplash debut?
Ask yourself where you want to make your first mistake. Kitchens are forgiving; a little wonkiness gets hidden by the chaos of pots and pans. Bathrooms, on the other hand, are less forgiving, so maybe save that for when you’re not a tile newbie.
Do I really need that fancy grout float, or is it just marketing fluff?
It’s not just a pretty name. The grout float’s your best friend for pushing grout into the gaps without scratching your tiles. It’s the difference between a professional look and a crumbly mess. Don’t skimp here.
The Unseen Beauty of Imperfection
As I stand back and survey the battlefield of my kitchen, I can’t help but marvel at the mosaic of triumph and defeat etched into these walls. Each tile, with its slightly uneven edges and stubborn grout streaks, tells a story of sweat, frustration, and that moment of clarity when I finally realized that perfection is just a myth. It’s funny how a simple task like installing a backsplash can strip away the layers of pretense and lay bare the real you. It’s raw, it’s messy, and it’s honest—much like life itself.
This journey hasn’t just been about tiles and tools; it’s been a lesson in embracing the chaos and finding beauty in the flaws. I’ve learned that sometimes the best stories are etched in crooked lines and mismatched patterns. So, here’s to the misfit tiles and the stubborn grout that refused to cooperate. They are the unsung heroes of this little adventure, reminding me that the real masterpiece is not in the picture-perfect outcome, but in the journey and the stories we collect along the way.